Astro4.5以降OGPの作成方法
投稿日:2024年4月5日(金)更新日:2024年5月18日(土)
ソフトウェア開発

最初に
これは予めAstroを環境構築している前提で話を進めます。
まだ環境構築していないならインストールをしてからこの記事を見ることをお勧めします。
今回のOGPの作成には Content Collections を使った方法で紹介します。
インストール
環境構築が終わったら次に以下のものをインストールします。
パッケージ管理はお好きなものでどうぞこの記事ではnpmで進めます。
npm i satori sharpyarn add satori sharppnpm i satori sharpファイル作成
作るファイルは生成したogpを画像に変換する物と動的に読み込みを行うファイルの2つが必要です。
satoriのデザインプレビューしたい場合はローカルで実行するかVercel OG Image Playgroundのサイトで確認してください。
satori内部にあるspanタグは自分で変数を定義してください。
import sharp from 'sharp'import satori from 'satori'
export async function getOgImage(text: string, tags: string[]) {  const fontRegular = await fetchFont("サイトのタイトル名" + tags + '#' + "コピーライト", fontFamily, 500)  const fontBold = await fetchFont(text + ("サイトのタイトル名", fontFamily, 700)
  const svg = await satori(<div      style={{        height: '100%',        width: '100%',        display: 'flex',        backgroundColor: '#fefefe',        padding: '48px',        fontFamily: `sans-serif`,      }}    >      <div        style={{          display: 'flex',          flexDirection: 'column',          justifyContent: 'space-between',          height: '100%',          width: '100%',          border: '6px solid #1e1e1e',          backgroundColor: '#FFFFFF',          borderRadius: '20px',          color: '#333',          padding: '48px',        }}      >        <div          style={{            display: 'flex',            flexDirection: 'column',          }}        >          <div            style={{              display: 'flex',              fontSize: '48px',              fontWeight: 700,              wordBreak: 'break-all',            }}          >            <span>タイトル名</span>          </div>          <div            style={{              display: 'flex',              flexWrap: 'wrap',              alignItems: 'center',              marginTop: 12,            }}          >
              <div                style={{                  display: 'flex',                  fontSize: 24,                  fontWeight: 500,                  backgroundColor: 'rgb(229,231,235)',                  padding: '4px 24px',                  borderRadius: 9999,                  marginRight: 12,                  marginBottom: 12,                }}              >              <span>タグ名</span>              </div>
          </div>        </div>        <div          style={{            display: 'flex',            alignItems: 'center',            justifyContent: 'space-between',            width: '100%',            fontSize: '24px',          }}        >          <span>サイトの著作名</span>          <span>サイトのタイトル名</span>        </div>      </div>    </div>,    {      width: 1200,      height: 630,      fonts: [        {          name: fontFamily,          data: fontRegular,          weight: 500,          style: 'normal',        },        {          name: fontFamily,          data: fontBold,          weight: 700,          style: 'normal',        },      ],    },  )
//SvgからPngに変換して返している  return await sharp(Buffer.from(svg)).png({ compressionLevel: 9, quality: 50 }).toBuffer()}
//必要なフォントの文字だけTTF形式でダウンロード関数async function fetchFont(text: string, font: string, weight: number): Promise<ArrayBuffer> {  const API = `https://fonts.googleapis.com/css2?family=${font}:wght@${weight}&text=${encodeURIComponent(text)}`
  const css = await (    await fetch(API, {      headers: {        'User-Agent':          'Mozilla/5.0 (Macintosh; U; Intel Mac OS X 10_6_8; de-at) AppleWebKit/533.21.1 (KHTML, like Gecko) Version/5.0.5 Safari/533.21.1',      },    })  ).text()
  const resource = css.match(/src: url\((.+)\) format\('(opentype|truetype)'\)/)
  if (!resource) {    throw new Error('フォントの取得に失敗しました。')  }
  const res = await fetch(resource[1])
  return res.arrayBuffer()}
生成に成功するとこんなものができると思います。 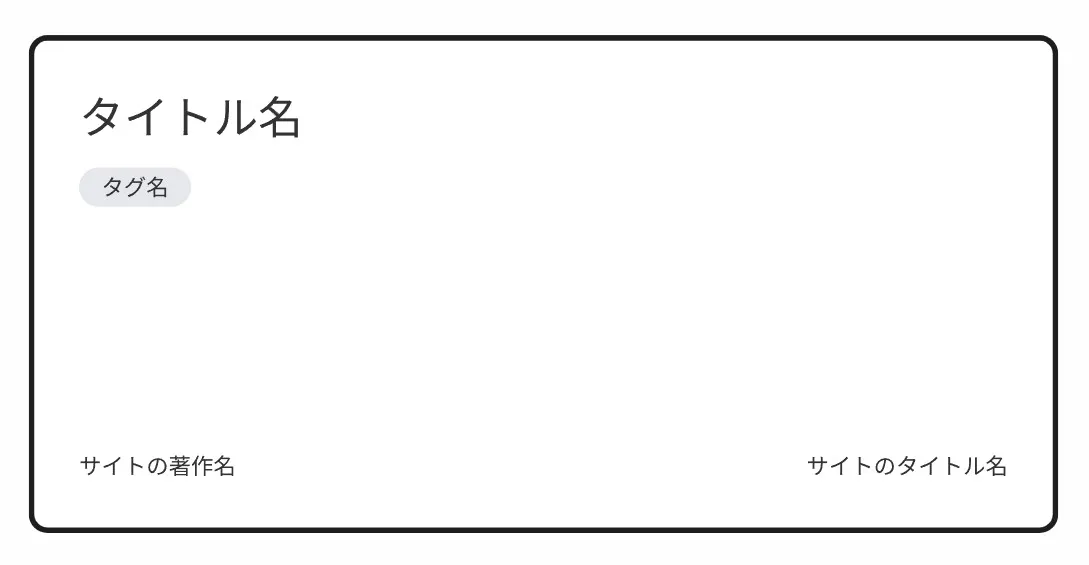
次にアクセス時に動的に生成するファイルを作成します。
import文の「getOgImage」呼び出しは自分が置いてる場所に指定してください。
Astroの場合は、タイトル名は必須項目なので、Null合体演算子は任意で削除してください。
import type { APIContext } from 'astro'import { getCollection } from 'astro:content'import { getOgImage } from 'path'
export async function getStaticPaths() {  const posts = await getCollection('blog')
  return posts.map((post) => ({    params: {      slug: post.slug,    },  }))}
export async function GET({ params }: APIContext) {  const { slug } = params  if (!slug) return { status: 404 }
  const post = (await getCollection('blog')).find((post) => post.slug === slug)  if (!post) return { status: 404 }
  const body = await getOgImage(post.data.title ?? 'タイトル名なし', post.data.tags)
  return new Response(body, {    headers: {      'content-type': 'image/png',    },  })}
次に動的にタグを取得します。
このコードは「タグ名」と書かれた場所にgetOgImage関数の引数tagsを呼び出しmap関数を実装してください。
<div style={{ display: 'flex', fontSize: 24, fontWeight: 500, backgroundColor: 'rgb(229,231,235)', padding: '4px 24px', borderRadius: 9999, marginRight: 12, marginBottom: 12, }} > <span>タグ名</span> </div> {tags.map((tag, i) => ( <div key={i} style={{ display: 'flex', fontSize: 24, fontWeight: 500, backgroundColor: 'rgb(229,231,235)', padding: '4px 24px', borderRadius: 9999, marginRight: 12, marginBottom: 12, }} > <span>{'#' + tag}</span> </div> ))}これで終わりです。
後は、テストして確認してください。